This is a post resurected from my old personal website.
There are many great examples and tutorials on creating a heightmap and texture for a terrain from Perlin noise. This is my own spin on that, but also a example on how you can turn the heightmap into a mesh for rendering.
In a later blog post, I would like to create a simple rendering app to display the generated terrain.
The source code is available on my Github. The code snippets in this text are not identical with the source code - they are more of a pseudocode to illustrate the algorithms and the general idea of how the code works, but the helper functions are omited and function calls are bit different.
Generating the heightmap
First we need to create the heightmap. We won’t be using Perlin noise, but Simplex noise. Simplex noise has the same author(Ken Perlin), but has some advantages - lower computational complexity and no direction artifacts are the main ones. For the actual implementation in python, I’ll be using the noise library.
We start by configuring the noise function:
def update_point(coords, seed):
    return noise.snoise2(coords[0]/SCALE,
                          coords[1]/SCALE,
                          octaves=6,
                          persistence=0.5,
                          lacunarity=2,
                          repeatx=MAP_SIZE[0],
                          repeaty=MAP_SIZE[1],
                          base=seed
                         )
Let’s look into the parameters a bit.
-
First two parameters are the coordinates.
-
octaves - The number of noise layers.
-
persistence - Dictates how much the subsequent layers affect the result. Numbers greater than 1 mean that the following layer affects the result more than the previous layers and numbers smaller than 1 are the oppossite.
-
lacunarity - Tells us the scaling of frequency of the following layer, here 2 means that the frequency of following layer is 2 times the frequency of previous layer.
-
base - the seed for randomization. For a single terrain, you want to keep this constant, but randomize it for each run to keep generating random terrains.
The frequency of the noise can be calculated as MAP_SIZE/SCALE.
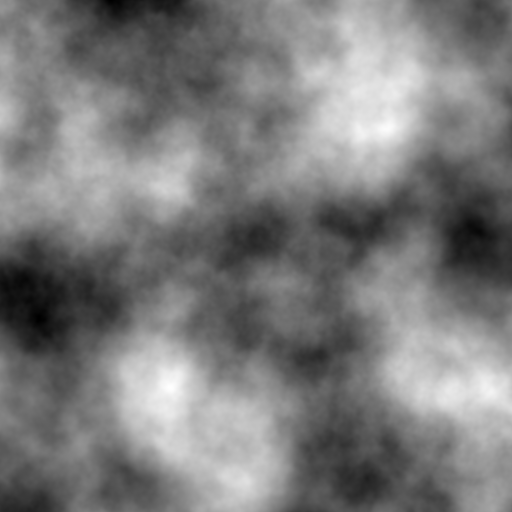
With the noise function configured, we can generate a heightmap. We also want to normalize it, to get nice 0 to 1 range, as the noise function has tendency to create a fairly weird minimum and maximum values.
import numpy as np

def generate_heightmap(map_size):
    seed = int(random.random()*1000)
    minimum = 0
    maximum = 0
    heightmap = np.zeros(map_size)

    for x in range(map_size[0]):
        for y in range(map_size[1]):
            new_value = update_point((x, y), seed)
            heightmap[x][y] = new_value
    return normalize(heightmap)
The result is this heightmap:
We can further tweak the heightmap with exponentional function to create either plateaus or very sudden peaks.
def expo(heightmap, heightmap_size, e):
    for x in range(heightmap_size[0]):
        for y in range(heightmap_size[1]):
            heightmap[x][y] = heightmap[x][y]**e
    return normalize(heightmap)
This is the same heightmap with exponents of 0.65, 1 and 2:
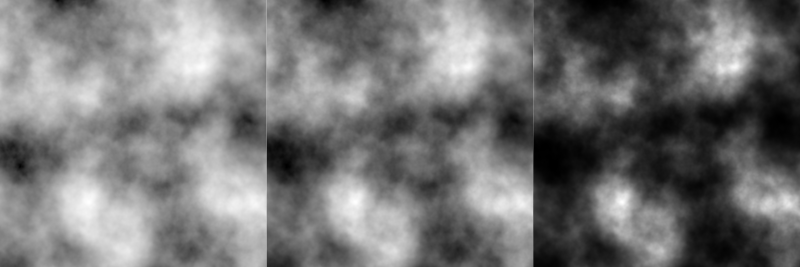
I prefer the more peaky map, so I’m going to use exponent of 2, but it fully depends on what kind of terrain you want to create.
Generating the texture
I’m going to use a simple approach to generating the texture. We are going to map the height to a color, so for example, heights under 0.2 are all water, or blue, above that you have sand, grass, forests, etc. This creates nice looking terrain map if you look at the texture in 2D. But it does create very obvious “levels” when it is mapped onto a 3D terrain.
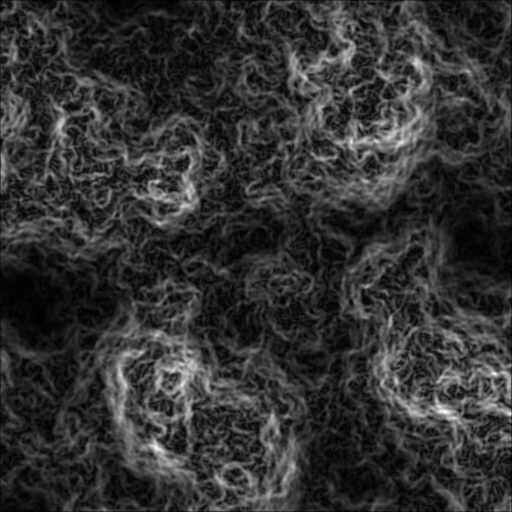
To break up the look a bit, I’m going to try calculating the slope of the terrain and putting a rock color in places where it is above certain threshold. We need to calculate the slope for every point on the map, creating a “slopemap”.
The calculation is pretty simple - it is the average of the difference between point (x, y) and its 8 neighbors. I guess it’s form of a discrete derivation or like that.
lut_vectors = (
    (-1, 1), (0, 1), (1, 1),
    (-1, 0),         (1, 0),
    (-1, -1), (0, -1), (1, -1)
)

def generate_slopemap(heightmap, heightmap_size):
    slopemap = np.zeros(heightmap_size)
    for x in range(heightmap_size[0]):
        for y in range(heightmap_size[1]):
            slope = 0
            for vector in lut_vectors:
                coord = (x+vector[0], y+vector[1])
                if out_of_bounds(coord):
                    continue
                slope += abs(heightmap[x][y]-heightmap[coord[0]][coord[1]])
            slope = slope/8
            slopemap[x][y] = slope
    return normalize(slopemap)
The slopemap does look pretty funky:
With the data from heightmap and slopemap, we can calculate the color at any given point:
def get_color(height, slope):
    if height > 0.2 and height < 0.9 and slope > 0.45:
        return COLORS["rock"]
    if height <= 0.2:
        return COLORS["water"]
    elif height > 0.2 and height <= 0.225:
        return COLORS["sand"]
    elif height > 0.225 and height <= 0.45:
        return COLORS["grass"]
    elif height > 0.45 and height <= 0.85:
        return COLORS["forest"]
    elif height > 0.85 and height <= 0.9:
        return COLORS["rock"]
    elif height > 0.9:
        return COLORS["snow"]
The thresholds can be finetuned for a better look, these are just a baseline. These values generate this texture.
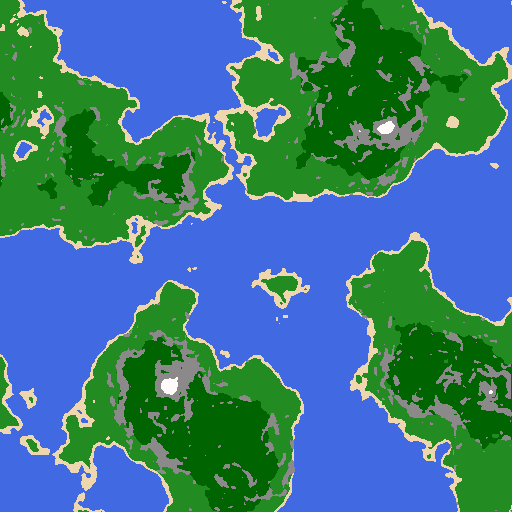
For a comparsion, here is the same texture without using the slopemap:
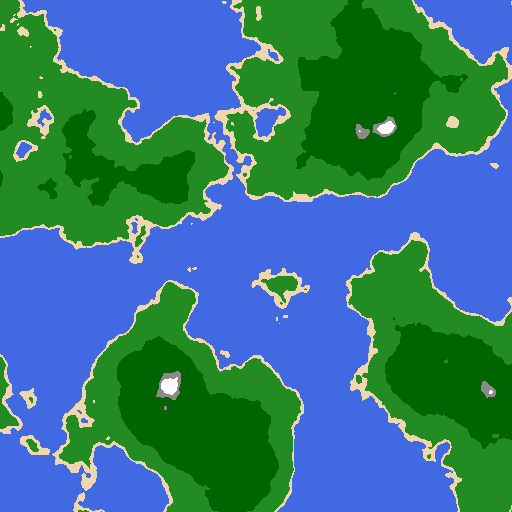
Personally I think this enhances the look of the terrain a lot, making it also look a little bit more realistic.
Converting heightmap to a mesh
Now that we have our heightmap, we need to convert it a suitable format for a rendering engine. As I want to craete a simple OpenGL rendering engine for it, I’ll be using format which can easily be used by OpenGL.
Let’s first explore the format:
I’ll be using “Y is up” coordinates, as that is what OpenGL generally uses. We will have list of vertices(points in 3D space) and list of triangles(faces) of which the mesh is made up. You could also use quads as the faces, but triangles are simpler, atleast in my opinion.
vertices = [(x1, y1, z1), (x2, y2, z2), ... , (xn, yn, zn)]
tris = [(0, 1, 2), (0, 2, 3), ...]
The tris are defined using the vertex index, so triangle (0, 1, 2) is a triangle between vertices at index 0, 1 and 2 in the vertices list. That is the whole format, it is incredibly simple.
But how do we transform the 2D grid heightmap to this format? First we need to decide how to align our 2D array into 1D one. The most common way is to put take each line and put them into a single line, like so:
|0, 1, 2|
|3, 4, 5| ---> (0, 1, 2, 3, 4, 5, 6, 7, 8)
|6, 7, 8|
Indexing the items is fairly simple, if you know the dimensions of the original 2D array:
new_index = original_x_size * x + y
Knowing how we are going to align and index the new arrays, we can write basically the whole function:
def generate_vertices(heightmap, heightmap_size):
    vertices = []

    # The origin and size of mesh
    origin = (-1, -0.75, -1)
    size = 2
    max_height = 0.5

    # We need to calculate the step between vertices
    step_x = size/(heightmap_size[0]-1)
    step_y = size/(heightmap_size[1]-1)

    for x in range(heightmap_size[0]):
        for y in range(heightmap_size[1]):
            x_coord = base[0] + step_x*x
            y_coord = base[1] + max_height*heightmap[x][y]
            z_coord = base[2] + step_y*y
            vertices.append((x_coord, y_coord, z_coord))
    return vertices
Calculating the indexes for the triangles is quite simple. I think a diagram and bit of python can explain it a lot better than text.
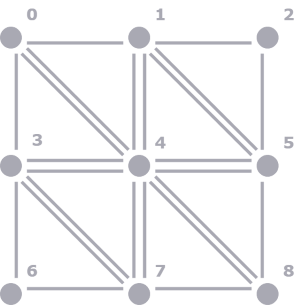
triangles = []
a = index
b = index + 1
c = index + x_size + 1
d = index + x_size
triangles.append((a, b, c))
triangles.append((a, c, d))
Now we just need to do it for every vertex in the vertices list, apart from the last row and column:
def generate_tris(grid_size):
    tris = []
    for x in range(grid_size[0]-1):
        for y in range(grid_size[1]-1):
            index = x*grid_size[0]+y
            a = index
            b = index+1
            c = index+grid_size[0]+1
            d = index+grid_size[0]
            tris.append((a, b, c))
            tris.append((a, c, d))
    return tris
Testing the mesh output
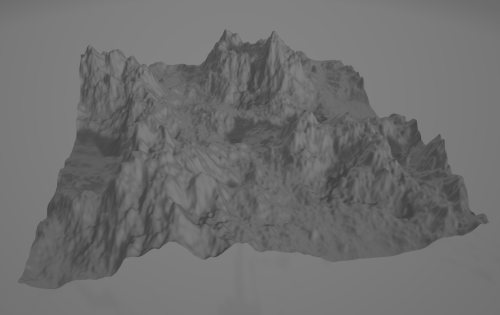
To verify that the mesh output is correct, I need to visualize it. I do not have a renderer created yet, so I’m going to export the mesh data to OBJ format. It’s very basic and similar to the format we have just created.
Converting the data to .obj file is fairly simple, we only have to increment the triangle indexes by one, as .obj files start counting at 1.
def export_obj(vertices, tris, filename):
    file = open(filename, "w")
    for vertex in vertices:
      file.write("v " + str(vertex[0]) + " " + str(vertex[1]) + " " + str(vertex[2]) + "\n")
    for tri in tris:
      file.write("f " + str(tri[2]+1) + " " + str(tri[1]+1) + " " + str(tri[0]+1) + "\n")
    file.close()
    return
Now we just need to import it to some 3D modeling/viewing software(Windows 3D Viewer works surprisingly well for this!) to display it.
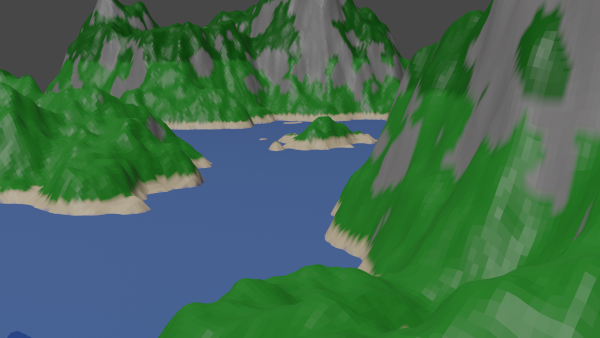
You can also be bit more fancy, import it into Blender and UV map it with the generated texture. You can see the very obvious “levels” noted in Generating the texture section.
Further reading/watching
These sources were both inspiration for this blog and also are a good place to continue reading:
Yvan Scher has written a nice article about generating islands.
Red Blob Games has very detailed article on generating terrain with noise and also incredibly detailed article on noise generation itself.
Sebastian Lague has a playlist about procedural terrain generation in Unity engine.